
It is my decorative apothecary bottles. I'm sure that a lot of you have done projects like this before and don't need instructions. But I thought that I would share the steps with those that may not have.


I bought 3 pretty little bottles from AC More... they were around 1.50 each.
Then I printed copies of vintage apothecary labels. Before cutting them out I coated them with a thin layer of white glue, Elmers type is fine, If your using a thick white tacky glue ...you might want to thin it out a tad with water or a little BLACK coffee. The coffee will help add to an aged look... If that is what your going for. That is what I was going for:)

After the glue is dry (you can speed the drying with a hair dryer, if your impatient like me) cut out the labels.
Spread a thin layer of glue on the back of the label... put a piece of paper or plastic sandwich bag under it ... so you can get the edges of the label good with out getting glue on your work surface. Position the labels on your bottle and let dry. If you started out with a black and white label (I'm out of colored ink :( ) like me , there is one more step, if you want an aged look. If you printed in color and your label started with an aged look, give it one more coat of glue and your done. If your label started out black and white and you don't want the extra step. You can edit the labels on your computer and put them in sepia tone... if you know how to do that. If not or if your out of colored ink like me ...here is what you can do.

If you used a tacky glue watered down with coffee you can just add an other coat over the top of the label and when that is dry... use the pad of your finger to spread a drop of coffee over the label dabbing up and down in some spots, for an uneven and somewhat blotchy effect. If you don't have black coffee or if you used an Elmers type glue ... try this. ad a drop of dk brown paint in your white glue or a burnt umber color paint. Test it out on scrap paper and let it dry just to see if you have the right amount paint in the glue and to make sure you like the color it turns out. If it dried a bit too dark, add a little more glue to lighten it up. Too light, add more paint. You can age your cork stopper, by rubbing it with coffee or watered down paint.
When your done you will be enjoying your little apothecary bottles like I am. They can be used as little vases too.


The second Project is my 80's framed print make over,
that cost me around $2 and some paint I already had.
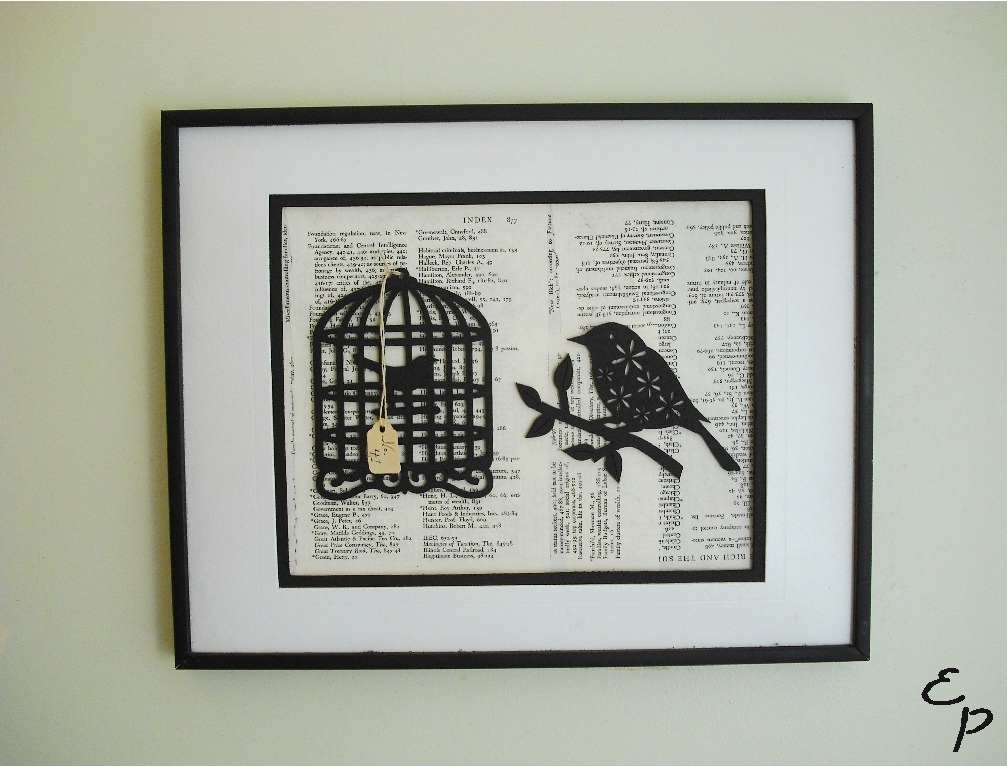
Below is kinda what it looked like before. I say kinda because I for got to take a before picture. So I took a picture of the print that was inside and added in print shop the mat and frame , that resembled the original.

The glass was broke, the mat was dirty and the frame very shiny.
So with a little spray paint and some creativity ...I gave new life to an unusable piece of art.
I sprayed the frame and the inner mat in a flat black paint. I then sprayed the outer mat in a white satin.
The piece of card board under the print I glued old book pages to as my backdrop. The same way I put the labels on the bottles(coat of glue on the bottom & and then on top after the pages were dry).
Then I took 2 wood cutouts that I got at the craft store for .99 cents each and painted them in a flat black and glued them on. To add my own little touch, I added the antiqued little tag.
The print is now displayed in my bathroom:)

It is on the nail that was already in there... I'm not sure if I should keep it in there or not.
But I do love how it turned out. If you have frames that the glass has been broken out and you don't want to spend the money to replace the glass. Frame something 3d like I did here. You can use old keys, scrabble tiles vintage buttons or jewelry. Just about anything you love you can frame and chances are you will love it when your done.
Last I did a paper lady project... that cost me $1.
I started with a graphic from the Graphics Fairy.

I printed her out on card stock... when I cut her out I improvised on the bottom of her gown and sort of cut a triangle shape from where the graphic ended. I also cut a spot over her head so I could punch a hole on her to tie ribbon or use for hanging. I used a Q-tip to put a little blush on her cheek and a little on her gown. I put 3 thin layers of tinted glue over her to protect her and stiffen her up. I also glued a flat wood stick on the back of her to strengthen her head and neck. Then she was done and ready for me to display the $1 vintage doily I bought on our crazy day out. That is what I made her for. I just folded the doily in half and then wrapped it around her waist. I think If you sprayed her with a little perfume she would be sweet hanging in a closet . She is hanging in my bathroom ... somehow all three projects ended up in my bathroom for now at least.
So there you go 3 projects... all made with a little paper n glue, all easy and all under $5
I hope you enjoyed them :)


Don't forget to come back on the 1st for Septembers button swap link party!
 Put me on your blog roll or grab a button from my sidebar now, so you don't forget about the party! I'm looking forward to seeing you all there! Here is my swap partner from the August 1st party:)


Francine,
ReplyDeleteThose bottles turned out great!They look so authentic too!
xx
Anne
I love those bottles. They would be absolutely perfect in my apothecary bathroom. I haven't been able to find bottles like that...we don't have AC Moore, but hopefully soon I will. I love a creative day like that!!
ReplyDeleteFrancine,
ReplyDeleteI absolutely love what you did with those bottles. You are a creative genius and the 3D picture is a great way to use a frame that doesn't have glass, I never would have thought to do that. The cutout is also a cute idea.
Talking about bottles, I have been wanting a blue seltzer bottle FOREVER! Perhaps someday I will find one that isn't so expensive. :)
Mailing your package today will e-mail with a tracking number later. :)
Thank you for sharing your lovely bottles and charming projects at Potpourri Friday at 2805!
ReplyDeleteI love your bird picture!!! Thanx for linking up to the party! Btw how do you change the font of comments?
ReplyDeleteFound you at Beyond the Picket Fence and I'm your newest follower! Love your blog!
ReplyDeleteAll three of your projects are adorable! You have inspired me to dig out some of my bottles that I have collected and put some labels on them. Thanks for the inspiration and enjoy your weekend, Gail
ReplyDeleteHi there, love the bottles, the labels look so authentic! And the styling is beautiful, Would love for you to stop by for a visit at La Maison Jolie. Have a super weekend! (http://lamaisonjolie.blogspot.com.au)
ReplyDeleteLove what you did with the frame! You took something that was Goodwill-bound and made it into something amazing. It looks great in the bathroom. Would love for you to share it at the All Star Block Party.
ReplyDeletehttp://newhousenewhomenewlife.blogspot.ca/2012/08/its-that-time-again-all-star-block.html
And thanks for following along on my little blog project.
Seriously so very impressed, really love the medicine bottles!
ReplyDeleteFrancine, you did a marvelous job on your projects! I like so much how you told us about the glue tinting! I never thought to tint my glue! I always try to get my original paper piece to be the 'right' color. This technique will save me a lot of time!
ReplyDeleteThanks so much for joining me for Pearls and Lace Thursday!!
Blessings, Doni
Found you on 'Kathe With an E.' :-) What a gorgeous header you have. I want to walk inside that photo and sit down on the comfy sofa! I like all your crafty ideas. The bottles redo is clever and so pretty!
ReplyDeleteLooks great! I love those bottles. Thanks for sharing at the All Star Block Party!
ReplyDeleteHolly
Your bottles are fantastic!
ReplyDeleteKaree
Great projects. The little lady is fab. I have been wanting to use some my old doilies and hankies in just that way!
ReplyDeleteAmber
This comment has been removed by the author.
ReplyDeleteLove these bottle and a cute tip I have learned Cinnamon is a great for aging too...add a little,this is how I have done it...on a vintage music sheet that is damp with tea,I sprinkle a little cinnamon and it gives a mottled effect..
ReplyDeleteTHANK YOU FOR FOR BECOMING A NEW FOLLOWER VERY HAPPY TO BE CLOSE TO 50...AND THEN IT IS ON TO 100 MY NEXT GOAL.
Your bottles are adorable. I love the birdcage and bird art you made. I may have to make one myself.
ReplyDeletehttp://www.laurieslittlebitsofcreativity.com/
You are so amazing!! I love visiting your awesome blog! I don't know which I love best....the beautiful bottles or the adorable bird picture!!! Thanks for always inspiring another project. :)
ReplyDeleteFrancine,
ReplyDeleteWhat beautiful work you do. I just loved everything, all three projects. Thank you so much for sharing these with the ALL STARS BLOCK PARTY... I loved them so much I am your newest follower and I am pinning these great idea's and I'm featuring them tonight in my FEATURED FIVE post.... Thanks again so much for sharing with us..
I just love it!!!
Carri
simplydonewright.blogspot.com
3 gorgeous projects Francine. Thanks for linking up at Shabbilicious Friday.
ReplyDeleteLove the bottles! They are so sweet! Thanks so much for visiting my blog and following. I'm happy to return the follow!
ReplyDeleteLOVE these bottles ... need to copy this.
ReplyDeleteThanks for sharing a great tutorial.
Blessings,
Audrey Z.
http://audreyzumwalt.blogspot.com/
Timeless Treasures
I love your apothecary bottles! Can I ask where you got the labels? I didn't see it referenced in the post.... I'd like to make some like this. :) Pinning! ~Rachel @ The Olde Farmhouse on Windmill Hill
ReplyDeleteWow...those bottles are adorable and really look vintage! Visiting from Knic of Time Tuesday.
ReplyDeleteRoselle
I really like those bottles. Thanks for the tips on getting that aged look. I really want to make some old bottles with labels for my Halloween decor.
ReplyDeleteI really love the frame/print you re-did...especially that you added the hanging tag. It added another layer of interest and made the piece pop!
ReplyDeleteThese are fabulous adorned bottles...so pretty, love the way you aged them! Popping over from Faded Charm to say hello!
ReplyDeleteGreat bottles. LOVE you you explained how you did them!
ReplyDeletexoRebecca
What fun projects. They all turned out great! Thank you for sharing this with us at TTF. Have a fun day!
ReplyDeleteThanks for all the how to's, your projects are beautiful, want to do this for Hallowen bottles, was hoping I didn't have to use mod podge, will try this!
ReplyDeleteFrancine....I love your three crafty projects!
ReplyDeletethose bottles are inspiring. Thanks for sharing your White Wednesday post.
Glad I popped by to visit with you.
ciao bella
your newest follower
Creative Carmelina
Thank you for joining me at HSH!
ReplyDeleteSherry
Francine, you have been quite the busy bee! I love them all. Thank you for sharing this at my Make it Pretty Monday party at The Dedicated House. Hope to see your prettiness again on Monday. Toodles, Kathryn @TheDedicatedHouse
ReplyDeleteDarling decorating cut outs, I love them!
ReplyDeletethe bottles great i love them xxx
ReplyDeleteFeatured today at Shabbilicious Friday :)
ReplyDeleteI love your apothecary bottles! You really succeeded in creating a genuine vintage feel.
ReplyDeleteLove every one of your creative projects, especially the bottles and the way you have them displayed. Very, very clever and inspirational.
ReplyDeleteYour bottles are great.. You did a great job... Love that vintage look... ... Cindy
ReplyDeleteLOVE this! You make me want to go embellish some bottles I have! Those are fantastic - love the shape and the graphics - I am loving the artwork and the lady is fantastic - inspiring! I do appreciate you sharing with A Return to Loveliness,
ReplyDeleteKathy